Connect via USB
Setting up your Raspberry Pi as an Ethernet gadget (over USB) allows you to connect your Raspberry Pi Zero with just a
single USB cable for both power and data.
There’s no need for Wi-Fi or an Ethernet cable!
We do not recommend this setup for complete beginners, as it requires making network configuration adjustments in Windows.
This setup is only supported on Raspberry Pi Zero models.
Other Raspberry Pi models are not compatible.
Requirements
To proceed with the setup, ensure you have the following:
- A Raspberry Pi Zero (W)
- A micro SD card flashed with our custom Raspberry Pi image (version v12 or newer)
- A micro USB cable
- The MoBro Windows application installed and running on your Windows PC
Setup
To make this work, we need to:
- Configure the Raspberry Pi Zero.
- Adjust some network settings on your Windows PC.
1. Configure the Raspberry Pi
-
Flash the custom image:
Ensure your microSD card is flashed with at least v12 of our custom image. Insert the card into the Raspberry Pi Zero. -
Connect the USB cable:
Use a micro USB cable to connect the Raspberry Pi to your PC. Be sure to plug the cable into the USB port ( not the "PWR" port) on the Raspberry Pi Zero. -
Boot and configure:
Once the Raspberry Pi has booted, connect to the configuration hotspot as you would in the regular setup. -
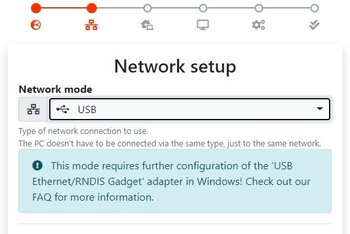
Select USB mode:
In the 'Network setup' step, choose the 'USB' network mode as shown below:
-
Complete Raspberry Pi setup:
Continue with the configuration process as usual, setting up your display driver, screen saver, etc. Once done, the Raspberry Pi portion of the setup is complete.
After applying the configuration, the Raspberry Pi will reboot twice.
This process may take a few minutes on the Raspberry Pi Zero, so please be patient.
2. Configure Windows
Now let’s set up the necessary network settings on your Windows PC.
-
Install RNDIS drivers:
After applying the configuration and rebooting the Raspberry Pi Zero, Windows will automatically detect the device and install RNDIS Ethernet drivers. -
Locate the RNDIS adapter:
Open Network & Internet Settings in Windows and click on Change Adapter Options.
You should see a new network adapter called RNDIS Gadget (or similar). -
Adjust adapter properties:
- Right-click the RNDIS adapter and select Properties.
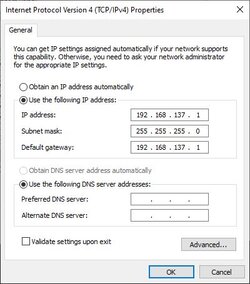
- Select Internet Protocol Version 4 (TCP/IPv4) from the list and click Properties.
- Enter the following values:
- IP Address:
192.168.137.1 - Subnet mask:
255.255.255.0 - Default gateway:
192.168.137.1
- IP Address:
3. Share Internet Connection (Optional)
To enable internet access on the Raspberry Pi, you need to share your PC’s internet connection.
-
Enable internet sharing:
- Go back to Network & Internet > Change Adapter Options.
- Right-click your main network adapter (the one connected to the internet) and choose Properties.
-
Configure sharing settings:
- Switch to the Sharing tab.
- Check the box to Allow other network users to connect through this computer’s Internet connection.
- From the dropdown, select the RNDIS network adapter (your Raspberry Pi Zero).
-
Confirm changes:
A warning may appear saying Windows will change the IP address of the selected adapter to192.168.137.1. This is expected, as we’ve already assigned this address to the RNDIS adapter. -
Reboot the Raspberry Pi:
Perform a final reboot of the Raspberry Pi to ensure all settings are applied correctly.
Once done, your Raspberry Pi Zero should be able to connect to the MoBro app running on your PC and appear as a connected dashboard.
SSH Access
After completing the setup, you can connect to your Raspberry Pi Zero via SSH for additional configuration or maintenance.
- IP Address:
192.168.137.2 - Username:
modbros - Password:
modbros
This concludes the setup process! Your Raspberry Pi Zero is now configured to work over USB for both power and data.